Shipping updateWe're back and shipping. Thank you!We are working through our backlog of orders as quickly as possible.We're back and shipping. Thank you!We are working through our backlog of orders as quickly as possible.
Bond the receiver to the glass, wire it to switched 12V, snap the detector on. Work straight down the page - the three prep steps are what decide whether the bond lasts.
Before you start: don't peel the 3M backing until steps 1 to 3 are done. The bond is won or lost in the first minute, and the tape only goes on once. Adhesive failures caused by improper preparation are not covered under warranty.
01
Position
Choose the spot
Where the receiver sits decides how well the detector sees down the road, and whether you can get it off again.
Sit the detector level with the horizon so it looks straight down the road - that's how it picks up radar best.
Leave at least 2.5 cm of clearance between the front-top of the detector and the headliner. You remove it by tilting the front up to release the lip, so it needs room to lift.
Dry-fit before you commit: hold the mount in place, check your view of the road, and check the power tail reaches where it's going.
Minimum clearance for unlatching: 2.5 cm between the front of the detector and the headliner.
02
Prep
Warm the glass
The glass should feel warm to the touch - ideally 20°C to 38°C. Cold glass is the most common reason a mount lets go later.
Cold day or winter install? Run the defroster or a hairdryer over the spot for 1-2 minutes.
Below 15°C the acrylic foam in the 3M tape turns firm and glassy. It can't flow into the microscopic peaks and valleys of the glass, so tack feels weak and the bond fails under vibration.
Above 38°C - a windscreen hot from direct sun - the adhesive goes too soft, and pressing can shear the foam core and build stress into the tape before it cures.
03
Prep
Wipe, then buff dry
Use the isopropyl prep wipe included in your box. How you dry it matters more than how you wipe it.
Wipe the mounting spot with the alcohol wipe.
Buff it dry straight away with a clean microfibre cloth, while it's still wet.
Don't let it air dry. Wiping while wet lifts the dissolved oils away; air drying just leaves them back on the glass.
Skip paper towels - they shed lint onto the surface you just cleaned.
Don't touch it after this. Fingerprints put the oils straight back on. Go from buff to mount without a break - prep is what the bond depends on, and adhesive failures from poor prep are not covered under warranty.
04
Mount
Press, then leave it alone
You get one placement. Line it up dry, then commit.
Peel the 3M backing and place the receiver on the spot you dry-fitted.
Press from the centre outward for 30 seconds minimum. Never press on the logo side - it can crack the plastic.
Leave it undisturbed for 36 hours before loading the detector. 72 hours for the Escort Redline 360C.
Do not skip
Wait 36 hours before you load the detector
Press from the centre outward for 30 seconds, then leave the receiver completely alone for 36 hours - 72 hours for the Escort Redline 360C. 3M VHB keeps building strength after it goes on and only reaches full bond at 72 hours. Hang a detector on it early and the tape peels off the glass under the leverage of the arm.
Adhesive failures caused by skipped preparation or an early load are not covered under warranty. Warm glass, buff dry, 30 seconds of firm pressure, then wait - that is the whole job. Read the warranty terms
05
Wiring
Connect switched 12V
Your receiver ships with a D2 quick disconnect already fitted, plus one of two power tails. Follow the option that matches the tail in your box.
Easiest
Option A - Mirror tap
Spade-plug tail. Piggybacks the power feed already running to your rear-view mirror.
Drop the mirror cover to expose the power loom
Identify the switched 12V and ground wires (a multimeter helps)
Slip the spade plugs onto the matching wires - no cutting, no splicing
Tuck the tail along the headliner and refit the cover
Option B - Hardwire (fuse tap)
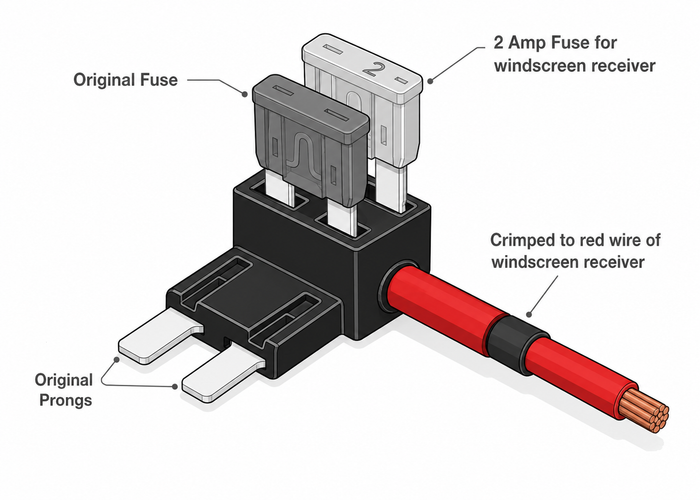
12V bare-wire tail with a ring-terminal ground. Taps a switched fuse slot for ignition-controlled power.
Ground: bolt the black ring terminal to any bare-metal chassis bolt
Power: connect the red wire to a switched fuse slot via a fuse tap
2A fuse into the slot furthest from the tap blade
Original fuse into the remaining slot
The original fuse must be rated higher than 2A
Tuck the wires along the headliner and down the A-pillar
Option A - Mirror tap
1Drop the trim coverEase the cover off the mirror stem with a plastic trim tool.The factory wiring harness plug sits directly behind it.2Find switched 12VRed probe to the live wire, black probe to ground. The correctwire reads ~12V with the key on and 0V with the ignition off.3Push the spades onThe RAD MAG tail ends in flat spade prongs that slide intothe back of the factory connector alongside the OEM pins.4Tuck and refitPress the cable up behind the headliner seam above themirror, then click the trim cover back over the stem.
Option B - Hardwire
1Bolt the ground loopScrape the paint back around a factory bolt, then clamp thebrass ring under the bolt head. Paint underneath = bad ground.2Pick a switched slotPull fuses until you find one that is dead with the ignition off.Keep that fuse - it goes back into the tap. Never alarm or ECU.3Load the fuse tapOriginal fuse into the lower socket, inline above the blades.New 2A into the offset socket. Original must be rated above 2A.Fuse tap sold separately - not included with the receiver.4Route the wireAlong the headliner, then down the inner edge of the A-pillarto the fuse box. Never across the curtain airbag deploy path.
Not sure which tail you have? Mirror tap ends in two flat metal spade plugs. Hardwire ends in a red wire plus a black ring terminal.
Switched 12V only. Verify polarity and switched-vs-constant with a multimeter before you connect. A constant live feed will drain your battery while the car is off.
Now included
Every powered receiver now ships with a D2 quick disconnect fitted to the receiver tail. Changed your mind on how you take power, or moving the mount to another car? Unplug one connector and plug in the other lead - no rewiring, no cutting. Spare mirror-tap or hardwire leads are sold separately.
06
Done
Snap it on and drive
Snap the detector arm onto the receiver - the magnets pull it in and locate it on the pins.
Start the car and check the detector powers up.
To remove: tilt the front of the detector up to release the lip, then twist and pull it off the magnet.
Need a hand?
Mirror tap is the cleanest install - no fuses, no splicing. Not comfortable with vehicle wiring? Any local car audio shop can finish either option in under 15 minutes.